Setting up your Zhtta Server on EC2
This page explains how to setup your Zhtta server running on EC2. After following these steps, you will have a server running on an EC2 instance that can serve external requests. Submit the URL of your server for benchmarking to the Benchmarking Server.
-
Visit http://aws.amazon.com/ and click on "Get Started for Free". (If you already have an Amazon account, you can use that, but it is not necessary to have a paid account to do what you need for this assignment.)
-
Create an AWS account by entering an email address and filling in the rest of the Amazon forms. You will need to provide a credit card number to create the account, but everything you need to do for this assignment is free. (If you do not have a credit card number to use for this, contact me for an alternative.)
-
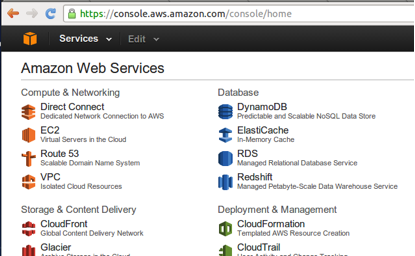
Log in your account, and visit the AWS console page at https://console.aws.amazon.com/ and click the EC2 icon.
-
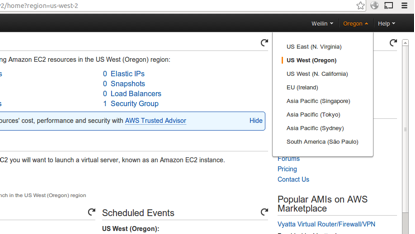
In the EC2 Dashboard, click the "Oregon" button at the right top bar, switch to "US East(N. Virginia)" to select a nearby server.
-
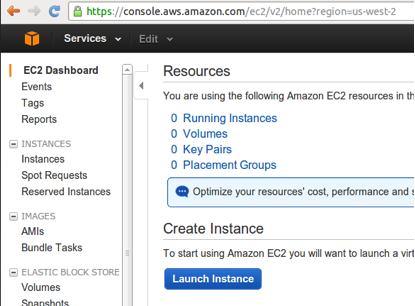
In the page of US East (N. Virginia) datacenter, click "Launch Instance" to start creating and configuring your VM.
-
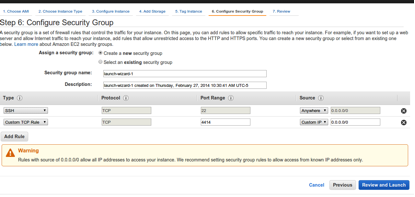
There are seven steps in the VM configuration page (but only three that are necessary for this):
- Select "Ubuntu Server 12.04 LTS (PV)" under "Quick Start" label to create a VM running Ubuntu.
- Confirm the instance type "Currently selected: t1.micro (up to 2 ECUs, 1 vCPUs, 0.613 GiB memory, EBS only)", otherwise Amazon may charge your credit card. (Don't think you can win the benchmarking contest by picking a more powerful server instance! We will conduct additional tests on the winning servers to verify that a server built from the code you submitted has performance similar to what was measured.)
- Jump to Step 6: Click "Add Rule" to open the access to TCP port 4414 on your VM, then click "Review and Launch", then "Launch".
-
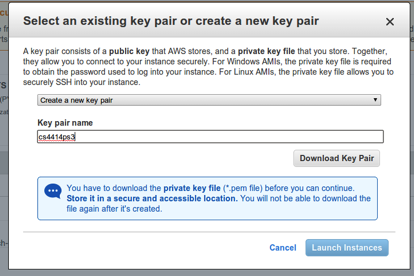
In the message box for creating a key pair, create a new key pair, and download it to your machine, then click "Launch Instances".
-
After waiting for a few seconds, the browser should redirect you to a new page, click the instance ID in the page to review your VM.

-
Find the "Public IP" of your VM instance in the profile page, and upload zhtta to your EC2 VM instance:
localhost $ scp -i cs4414ps3.pem ./zhtta ubuntu@[public IP of your VM]:~/
localhost $ ssh -i cs4414ps3.pem ubuntu@[public IP of your VM]
(If you build a new zhtta, you only need to repeat the scp step to update the version on your EC2 instance.)
Then, set up files in the test directory:
EC2-ubuntu $ mkdir www; cd www;
EC2-ubuntu $ dd if=/dev/urandom of=5K.bin bs=5K count=1
EC2-ubuntu $ dd if=/dev/urandom of=5M.bin bs=5M count=1
EC2-ubuntu $ dd if=/dev/urandom of=10M.bin bs=10M count=1
EC2-ubuntu $ dd if=/dev/urandom of=20M.bin bs=20M count=1
EC2-ubuntu $ dd if=/dev/urandom of=40M.bin bs=40M count=1
EC2-ubuntu $ dd if=/dev/urandom of=80M.bin bs=80M count=1
EC2-ubuntu $ cd ../
and start Zhtta running on your EC2 instance!
EC2-ubuntu $ ./zhtta --ip “0.0.0.0”
Benchmarking Submission
Now, you are ready to submit your server for benchmarking. Visit the benchmarking server. Submit the public IP address of your EC2 instance.
You can submit more than once, but if you submit it too many times Amazon will rate-limit the network bandwidth of your instance, resulting in a worse score (and at some point, you may exceed the bandwidth available on the free tier, and Amazon may start charging you).